Having spent good money on your leather bags, shoes, clothing, furniture and other leather accessories, sooner or later, you need to maintain them properly in order to get the most out of them for many years.
Because you have absolutely no idea how the leather on your leather possessions was tanned, treated and dyed, leather has always been a rather tricky natural material to work with, no less its upkeep.
Different leathers absorb leather conditioning lotions and cleaners differently, so a patch test is necessary to determine how much conditioner to apply to your leather goods. As Finished leathers often have protective surface coatings that slow their natural absorption rate, your shoes and bags only absorb a small amount of leather conditioner at a time.
It is so easy for all the “leather care experts” out there to advise us to do a patch test on a discrete part of your leather goods without ever specifying the correct parts to conduct the test because Captain Obvious is unwilling to go further beyond stating the obvious. I will go one step further and tell you exactly where you should be testing out the leather cleaners/conditioners.
Leather Patch Test In Wrong Places
First & foremost, testing of leather conditioners be it creams or liquids on a discrete part of your expensive leather bag and shoes should only be done as a last resort! Let me explain why.
Let’s start with handbags where it is pretty obvious that the discrete part can only mean the non-visible interior. Despite the endless varieties of handbags designs, the vast majority incorporate a high quality liner made of silk or other high quality soft fabrics stitch into the handbag interior, thus rendering testing next to impossible.
Even if the interior of handbag is not covered with fabric, the leather lining the interior is often not the same leather used on the exterior and is usually lined with high quality soft leathers such as goatskin leather like Chevre leather, as an example. Hence, again, testing is out of the question.
So What’s the Solution then?
Bags
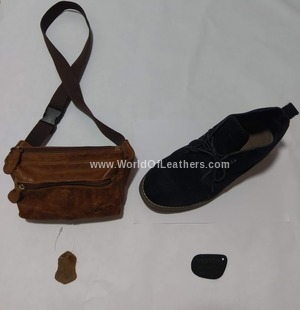
More often than not, your prized leather bag comes with a bag tag that is made from the same leather as the bag itself. As you can see from my own PRADA Deerskin Messenger Bag shown in the attached photo, it comes with a bag tag made from the same exact leather. You should use that tag to test out any leather cleaning solutions and conditioners so that if anything goes wrong, the damage is limited to the tag only!
Shoes
As for your shoes, there are even far more limited places to do a patch test. Again, the leather interior is often unlikely to be the same leather as that used for the exterior. Also, if your shoe has a tongue, the underside of the tongue is the only non-visible area to do the patch test but is often not feasible because the leather surface is not the same as the exterior.
 Hence, if your shoe happens to come with a shoe tag like the one shown here in the photo, then you should use it to do the patch test as it is usually made from the same exterior leather.
Jackets
Now for your leather jackets, the inner cuff is the one and only recommended part of the jacket to do the patch test. Do not do any patch test on the underside of the collar because if things go horribly wrong, you will not be able to flip your collar up again to provide additional protection from the weather or as a fashion style since your mistake will then be on display for everyone to see.

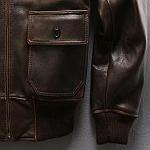
 If your jacket design is a leather flight jacket or aviator bomber jacket where the ribbed cuffs and collars are not made with leather but wool or fur etc. then you should do the patch test on 1.) the inner side of the pocket flap and/or 2.) the available leather on the inner lining as shown in these photos.
Furniture
Lastly, when it comes to your leather furniture, your choices are equally limited. I will make the herculean effort of lifting or tilting the leather sofa/seater/recliner to expose its underside and use the available exposed leather surface area which is often limited, to do the patch test.
Do not use the back of your leather sofa to do the patch test for 2 reasons. Firstly, if your leather sofa is not full leather, then it makes the test pretty much useless as the back and/or sides may react differently from the main seating portions to the test solutions given it is made from a different material.
Secondly, unless you are pretty certain your furniture will always be backed up against a wall or other furniture items, a patch test result that goes wrong means you can never showcase your leather furniture as the centrepiece of your living room ever again.
Proper Application & Treatment
Now that you know how and where to test your leather for cleaning solutions and conditioning creams / liquids, always remember to use only a small amount of conditioner at a time and gently apply it in circular motions. Using thin, even layers to give the surface a balanced coat helps prevent splotchy drying.
After the conditioning is complete, wipe off any excess amount and leave your leather goods to air dry for at least a day before using or storing.
