Leather is a versatile material used in many industries from fashion to automotive. As a material, leather is durable, but it can be damaged. Mold, cracks and age can destroy the beauty of your leather. Luckily, most damage can be repaired. Learning how to repair leather saves money by eliminating the need to replace your leather items.
There are several types of leather on the market. Leather from cowhide is the most commonly used; however, leather can come from a wide variety of animals, including exotic ones like ostrich, python, stingray and kangaroo.

The method used to produce the leather is dictated by the end-product. The type of leather used in clothing manufacture is different from the type used for footwear or luggage. Leather used in fashion is different to that used in bookbinding and drum making. Tanning leather with different materials can affect the softness, washability and appearance of the hide.
Before attempting to repair leather yourself, contact the retailer and/or manufacturer for their advice. Many leather manufacturers have repair kits to fix damaged leather. Since each type of leather is slightly different, using a kit specifically designed for your leather gives the best results.
If the manufacturer does not have a recommended method of fixing damage, you need to take use a general approach to leather repair. The type of repair needed is determined by the type of damage:
How to Repair Leather That Is Cut, Cracked and Worn

Not all leathers can be repaired. You need to know what type of leather you are trying to repair. It is usually easier to repair Pigmented/Sealed/Protected Leathers which includes (some Full-Grain, all Corrected Grain and all Split) leathers for the following reasons.
A leather paste commonly known as Stucco is often applied on the hides towards the later stage of the manufacturing process to cover all surface imperfections. Followed by the application of a clear sealant top coating to the leather during the final end stage manufacturing process.
The Stucco and clear sealant top coating enable the manufacturer to enhance some of the properties of the leather, e.g. resistance to fading, scuffing and prevent colour transfer to clothing.
It is this surface coating that we are trying to repair to when it is cracked and worn out! We are reapplying a similar paste to Stucco to cover up all the new surface imperfections again.
Cut, cracked and worn leather should first be cleaned with a solution of warm PH neutral soapy water. Wring the cloth before wiping down the area. Rinse and repeat until the area is clean, then wipe off any soap residue with a water dampened cloth. Allow the area to dry completely.
If necessary, use rubbing (Isopropyl) alcohol (may need to dilute to 50% strength) on a cloth to wipe away any residual conditioners or soap residue remaining on the surface of the leather. Allow the area to dry again.
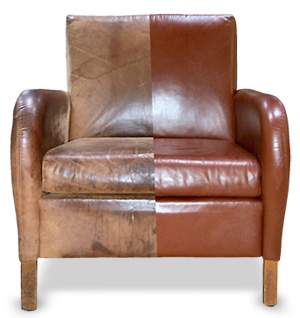
Next, apply a leather repair compound (Stucco) to the surface. The compound needs to cover the damaged area, as well as 1/2 inch of the surrounding surface. The surface should be as smooth as possible. Allow the area to dry. Repeat the application up to four more times, or until you get the desired result. Allow each application to dry completely. You can speed up the drying process in between applications by using a hairdryer on a low heat setting to blow directly at the filler.
Then, apply rubbing (Isopropyl) alcohol to a clean soft cloth and gently rub it over the area. If necessary, 600 grit sandpaper can be used on the repaired area to further smoothen the surface and blend it with the rest of its surroundings. Be sure to remove any sanding dust before applying dye or colorant to match the original color of the leather. Colorant may need to be applied in multiple coats, make sure to allow each coat to dry completely before applying the next. You can again speed up the drying process in between applications by using a hairdryer on a low heat and low power setting to blow directly at treated area.
After the last coat of colorant, allow the leather to dry for at least 24 hours. After it’s dry, apply a leather conditioner and sealer.
How to Repair Leather That Has Mold and Mildew
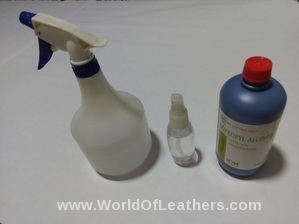
 Mold and mildew can be removed with a solution made from 1 part rubbing alcohol mixed with one part water. However, I find it a hassle to mix the solution on my own and I will simply purchase those 0.5L bottles of Isopropyl Alcohol 70% strength v/v and then transfer them into spray bottles of various sizes. This allows me some control over the amount dispensed to minimize uneven applications and blotches due to over spraying. But it may be better to dilute it to 50% strength for certain delicate leathers to avoid unintended consequences and minimize mishaps.
You can spray the solution on a soft clean cloth and wipe clean, or spray directly onto the affected areas and gently wipe away the mold. Allow the leather to dry but avoid direct sunlight.
 If you are uncomfortable working with Isopropyl Alcohol, alternatively, you can use high grade leather cleaners like the Gliptone Leather Cleaner which I have used on Pigmented (Protected/Sealed) leathers with consistently good results.
Caution – As I have mentioned time and time again in my other posts, there is no product in existence that can remove mold (mildew) every time without damaging the leather surface. There are simply too many varieties of leather out there with every leather piece tanned, treated and dyed differently so they may react unpredictably to the aforesaid cleaning products with disastrous consequences.
So, you need to learn how and where to test your leather for cleaning and conditioning solutions before attempting any repairs.
How to Repair Stained Leather
 It’s not always possible to remove all stains from leather. Some stains require a professional cleaning service or may simply not be removable at all. A common DIY method of stain removal includes scrubbing the area with Colgate toothpaste, then removing any remaining toothpaste residue. But I cannot recommend this method at all especially when the video clips I had viewed online do not appear to show the leather undergoing this stain removal process to be real leather.
Dangers of Using Nail Polish Remover & Hairspray
Some leather care websites suggest Ink stains can be removed with a non-acetone nail polish remover and tough stains removed with an aerosol hairspray. They advised us to spray and wipe the area several times until the stain is gone.
Once again, I cannot recommend this method at all because this only works to a certain extent, if and only if, the stain is sitting on top of the clear coat sealant and has not penetrated the clear coat sealant onto the leather itself. The nail polish remover and aerosol hairspray are actually attacking and dissolving the clear sealant so the sealant along with the offending stain are then removed using a clean cloth.
However, if the stain has penetrated all the way onto the leather, the use of a nail polish removal and aerosol hairspray will not only set the stain into the leather but it may also remove the original leather colour thereby creating a double whammy.
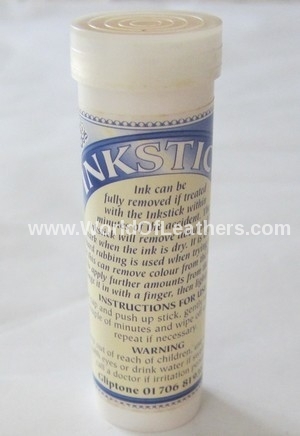
 Your best bet is to use a dedicated Leather Stain removal product like the Gliptone Ink Stick which I have used on many leather stains with consistently good results provided I had noticed the stain and used the Ink stick on it before it had a chance to dry.
If the stain has dried before you were able to treat it with the ink stick, there is a chance you may not be able to fully remove the stain without multiple applications in which case, there is always a risk that you may end up removing some of the original colour together with the stain.
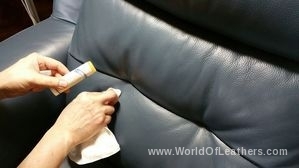
Apply the ink stick directly onto the stain by gently dabbing at it. You may use your fingertips to gently rub it into the stain and spread the paste thinly and evenly over the entire stain. Wait at least 1-2 minutes for the paste to work its magic on the stain and then gently rubbed away the stains with a soft white cloth as seen in this photo.
Limitations of Treating Oil Based Stains
However, what if the stain is oil based, for e.g the accidental dropping of a piece of cake or a strip of bacon on a leather sofa?
Some leather care websites confidently claimed that sprinkling a generous amount of a highly absorbent powder like baking soda, corn starch or talcum powder etc. over the stain promptly after its occurrence, and leaving it overnight to draw out and absorb as much of the oil/grease as possible, and then brushing it off will resolve the stain. I wished if only it was that really simple and straightforward.
I am not saying that you shouldn’t try it. By all means, go ahead and see if you can at least reduced the extent and severity of the stain. If you are able to remove the stain completely, Congrats! But that’s only because the stain had been sitting on the surface of the clear top coat sealant and didn’t managed to penetrate all the way through to the leather itself. There’s a good chance that in most instances, the oil stain would have made direct contact with the leather and then it is virtually next to impossible to remove the stain completely.
Your only recourse would be to use the same method for repairing tears, cracks and worn out areas as aforementioned above but that’s only possible for certain leather goods only. For example, if the affected leather item is a luxury leather handbag, then leave it to the professionals to redye your entire precious bag since it is highly unlikely you will be able to repair it properly on your own.
Removing Road Salt From Leather
Road salt is damaging to leather. This mostly affects people’s shoes and motorcycle rider’s jackets. Road salt can be removed by using a homemade solution made from 1 part vinegar mixed with 1 part water. Apply the solution to a cloth and wipe away the salt.
Alternatively, you can use the aforementioned Gliptone Leather Cleaner or similar product to achieve even better results.
Condition After Cleaning and Repairing
One step which is sometimes overlooked in repairing leather is conditioning. Conditioning will help keep the leather in good condition and help protect it from further damage.
To condition leather, use a commercial leather conditioning product or make your own BUT I no longer advocate making your own DIY leather conditioner and I would strongly recommend you to go with the commercial leather conditioner as the safer option.
If you’re unwilling to spend money on a commercial one and are willing to take the risk, a homemade conditioner can be made from 1 part white vinegar and 2 parts linseed oil. Apply this solution sparingly to the leather and allow the oil to be absorbed. But you have been warned, you will probably be paying a steep price for the long-term consequences of using these types of oils.
While many of these solutions will repair damage to leather, if the damage is extensive then you should not delay in seeking help from a professional because for the successful repairs of certain types of leather damages, Time is of the Essence.